78 guides
No matching topics. Try a menu name or a shorter keyword.
Getting started & navigation
05 topicsGet started in one session
Prepare your account and data before running SEO tasks or installing a chatbot.
Before you start
- A sign-in email, website URL and permission to manage the website when an integration is needed.
Step-by-step instructions
- Sign up or use Google when supported; create or select an organization. If approval is required, wait for activation.
- Check the organization in the top bar. Invite members and grant permissions appropriate to their work.
- Open Settings → AI configuration. Set up providers and models if your organization uses its own keys; check connectivity and budget.
- Create a Website or Landing Page project. Choose its URL, language and market. For multilingual websites, work on each language separately.
- Connect Google or WordPress if needed. Complete the project setup wizard before building a strategy or writing articles.
- For customer assistance, open Customer service → Settings, configure Assistant and Website, add knowledge and install the widget.
- Try a small workflow and check its results and access permissions before handing it to the whole team.
Requirements and notes
- Available tabs and actions depend on member permissions, subscription and enabled configuration. Check these conditions if a button is missing.
Understand common terms
An organization is a workspace; a project represents a website or landing page; a campaign defines the content execution scope within a project.
Step-by-step instructions
- Locale: one language or market in a multilingual website group, with separate data and URLs.
- Crawl: collect actual website pages. GSC means Google Search Console; GA4 means Google Analytics 4.
- Strategy / Planner / Writer / QC: build strategy, plan content, write and check quality, respectively.
- GEO / AI visibility: track and improve the likelihood of being mentioned in answers from AI platforms.
- RAG / AI training: provide sources the assistant retrieves before answering; this does not retrain model weights.
- Publish gate: quality requirements that the exact article revision must meet before publishing is allowed.
- YMYL: content that can affect health, finances or important decisions; it needs review by a qualified expert.
NeverSEO feature overview
Manage SEO projects and content campaigns, website and Messenger customer service, independent research and resources. The main menu includes Dashboard, Platform connections, Projects, Customer service, Resources, Tools, Reports and Settings. Settings includes Organization settings, Subscription, AI configuration, SEO data sources, Costs & Tokens, Members and API keys.
Step-by-step instructions
- Select your working organization and open the appropriate menu.
- For SEO: open Projects, select the website and language, prepare shared data and choose a campaign.
- For customer assistance: open Customer service. Inbox handles website widget conversations; Messenger handles fanpage conversations.
- To configure providers or subscriptions, open Settings and select a submenu if you are an owner or admin. On desktop, hover to open the side menu; click Settings to open Organization settings. Submenus appear below while viewing settings pages. On mobile, tap Settings to expand the list.
Requirements and notes
- Visible menus and tabs depend on permissions and project type. A missing menu does not mean the feature was removed.
- Features marked as planned are not available yet. Rankings or metrics are not guaranteed when data sources have not been connected.
Dashboard
An operational overview of the organization and projects within your permitted scope.
Step-by-step instructions
- Open Dashboard from the menu.
- Review the metrics and work status displayed on the page.
- Select the project you need to work on to open its workspace.
Requirements and notes
- Read live figures through the application's data tools. This guide does not contain your organization's metrics.
The in-app SEO Assistant
Use natural language to read authorized data, get usage instructions, open Subscription, Members, projects, plans and articles, run SEO diagnostics or technical audits, and write an article that does not exist yet on an explicit request. Web search and free-form image generation are available when their tools are granted.
Step-by-step instructions
- Open the SEO Assistant panel.
- Enter a specific question or request; use @ to select a project when needed.
- For instructions, describe the action and the screen where you are stuck.
- For execution, identify the action and exact project or article. Answer any clarifying choices if the target is ambiguous.
- Follow the task card for background work and check the result on the relevant page.
Requirements and notes
- Asking how to do something is not a command to run it.
- The assistant can execute only tools granted in that turn; it provides manual steps for other features.
- Starting a job does not mean it has finished.
- Stopping a task does not refund tokens already consumed.
Organization & configuration
08 topicsOrganization settings
Manage the organization name, timezone and autosave mode, and access administrative configuration.
Before you start
- Organization owner or admin.
Step-by-step instructions
- Open Settings → Organization settings.
- Edit the name, timezone or autosave mode as needed.
- Save and check the result.
Requirements and notes
- Organization settings are separate from individual project settings.
Members
Manage organization members, roles, permissions and invitations.
Before you start
- Organization owner or admin.
Step-by-step instructions
- Open Settings → Members.
- Invite a user or select an existing member to edit.
- Choose the role and capabilities required for their work.
- Save and check the invitation or displayed permissions.
Requirements and notes
- Permission to view data and permission to perform an action are separate.
- Do not grant permissions merely because someone claims to be an admin in chat.
Subscription
View your plan, benefits and quotas, and request a plan change or renewal through the payment or approval workflow.
Before you start
- Organization owner or admin.
Step-by-step instructions
- Open Settings → Subscription.
- Check the current plan, expiry and limits.
- Choose the available plan change or renewal action.
- Review the server-confirmed price and promotion, then complete the request or payment.
- Track its confirmation status.
Requirements and notes
- Renewal is not automatic. Do not assume activation until the system confirms it.
- Read prices and limits from current data rather than fixed figures in this guide.
AI configuration
The Providers, Model flows and Model benchmark tabs configure provider keys and models for each task.
Before you start
- Organization owner or admin.
Step-by-step instructions
- Open Settings → AI configuration → Providers and add or configure a provider through the form.
- Open Model flows to assign models to tasks, including chat and SEO agents.
- Use Model benchmark where your permissions allow it.
- Save, try a task and inspect any error.
Requirements and notes
- Do not send API keys in conversations.
- A model selected directly in chat may override the organization's chat configuration.
- Image models must use the correct API type. Do not substitute a chat model for an image model.
- A project-specific website assistant model has priority. On provider failure, the system tries available organization task/default models and then system models. Fallbacks still require a working provider and key.
- A default model may share a key with a model affected by a model-specific quota. Authentication, billing or account-wide limit failures require recovery or a different provider/key.
SEO data sources
Configure DataForSEO, SerpAPI, PageSpeed Insights and Google data sources for measurement.
Before you start
- Organization owner or admin.
Step-by-step instructions
- Open Settings → SEO data sources.
- Configure providers and keys through the available forms.
- Connect Google and select GSC/GA4 for each project under Integrations.
- Try collecting data and check its source and timestamp.
Requirements and notes
- Volume, keyword difficulty and SERP data are not automatically available when a source is unconfigured or returns no data.
Costs & Tokens
Track tokens and costs by month, agent and model, request history and AI agent reliability.
Before you start
- Organization owner or admin.
Step-by-step instructions
- Open Settings → Costs & Tokens.
- Choose the period and available filters.
- Review totals, the agent/model breakdown and request history.
- Inspect errors to identify the affected task or provider.
Requirements and notes
- Project action quotas and organization token budgets are separate limits.
- Canceled requests may still incur tokens actually consumed.
API keys
Manage organization API keys for system integrations.
Before you start
- Organization owner or admin.
Step-by-step instructions
- Open Settings → API keys.
- Create or manage keys using permitted actions.
- Store the key securely in the integration and check its permissions and scope.
- Revoke unused keys through the interface.
Requirements and notes
- Do not share secret keys in conversations. Organization keys are different from AI provider keys.
Platform connections
Connect Google, Facebook and GitHub and store organization-wide access permissions. Google supports Search Console, Analytics and documents; Facebook provides fanpage permissions; GitHub currently connects profile and email information.
Before you start
- Permission to manage connections.
Step-by-step instructions
- Open Platform connections.
- Choose Connect for a provider enabled by the platform and complete authorization.
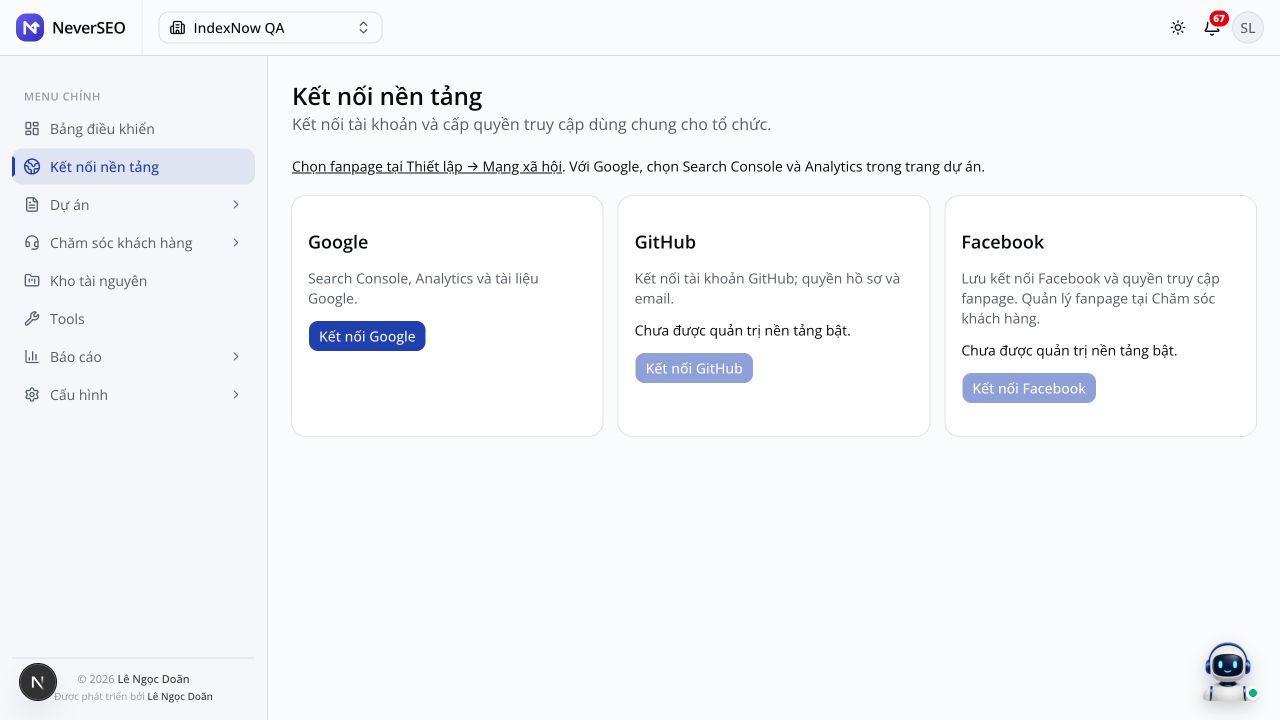
Step 2 · Select a provider in Platform connections. Facebook/GitHub are disabled in this example because the platform has not enabled them; the buttons are working as intended.Click the image to view it at full size. - For Google, open Project settings → Integrations to select Search Console and Analytics.
- For Facebook, open Customer service → Settings → Social networks to select a fanpage.
Requirements and notes
- Providers not enabled by the platform cannot be connected yet.
- This does not provide automatic GitHub repository synchronization or deployment.
- Facebook may grant pages_manage_posts for publishing. After OAuth, update each Page's connection permissions in Settings → Social networks to replace an old token.
Projects & data
08 topicsProjects
List and manage projects by website, scope and language, and open their shared data and campaign workspace.
Before you start
- Creating or editing projects requires manage_projects permission.
Step-by-step instructions
- Open Projects.
- Select an existing project or create one if you have permission.
- Complete the required form with the correct website and target language.
- Open the project and check shared data and campaigns.
Requirements and notes
- The landing_page scope does not include the full website campaign pipeline.
Project and campaign workspace
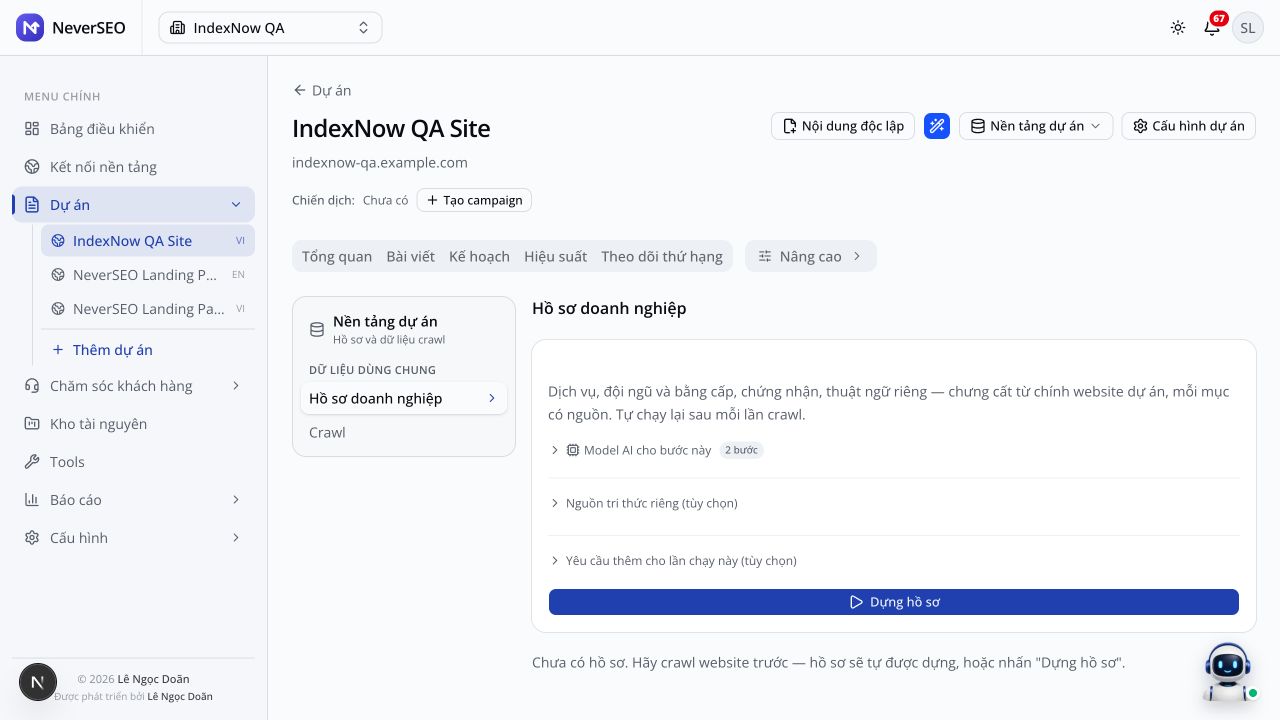
Shared data includes Business profile and Crawl. The campaign workspace includes Overview, Landing Page optimization, Articles, Plan, Performance and Rank tracking, plus Campaign foundation and Advanced analysis groups.
Step-by-step instructions
- Open Projects and select the correct website and language.
- Choose a campaign for campaign-specific SEO work.
- Use Shared data for Business profile and Crawl.
- Open the main work tab or advanced group you need.
Requirements and notes
- Do not construct URLs containing [id]. Use an actual project returned by a tool or select it in the interface.
Step-by-step project setup
Set up a project by following the steps displayed in the interface.
Before you start
- Permission to manage projects.
Step-by-step instructions
- Open the setup wizard for the correct project.
- For websites, follow the displayed SEO diagnosis, Business profile, Market research and SEO strategy steps.
- For landing pages, follow Landing Page diagnosis and Landing Page optimization; prepare a business profile when requested.
- Check data sources and prerequisites before each step, then run it if permitted.
- Wait for completion, read the result and answer follow-up questions before proceeding.
Requirements and notes
- Follow the steps actually shown; do not assume a button exists.
Project settings
Configure the General, Integrations, AI & Models and Advanced tabs: project context, markets and languages, Google/CMS connections, project models and monitoring.
Before you start
- manage_projects permission.
Step-by-step instructions
- Open the project → Project settings.
- Use General to edit context or target markets.
- Use Integrations to configure Google and CMS connections.
- Use AI & Models to configure project-specific models.
- Save and check the result in the interface.
Requirements and notes
- Project-specific settings may override organization settings.
Project knowledge base
Manage project knowledge and document sources for agents to read within their granted scope and permissions.
Before you start
- Permission to view and manage project knowledge.
Step-by-step instructions
- Open the project → Knowledge base.
- Review existing sources and processing status.
- Add appropriate documents or sources using available actions.
- Wait for processing to finish before asking an agent to use them.
Requirements and notes
- Business knowledge is different from software usage instructions.
- Competitor data must not be added to the customer advice knowledge base.
Connect GSC and GA4 to a project
Select an authorized Google account, Search Console site and Analytics property for the project, then save and synchronize data.
Before you start
- manage_projects permission and a Google account with the relevant access.
Step-by-step instructions
- Open Project settings → Integrations for the correct website and language.
- Under Google, select a connected account; if none is available, use Connect Google Account or Platform connections.
- Click Load GSC & GA4 list or Load GSC list, depending on account permissions.
- Select the correct Google Search Console site and, if authorized, the Google Analytics property (GA4).
- Click Save & synchronize or Save configuration, as displayed.
- Check synchronization status/results and the Performance tab before using the figures.
Requirements and notes
- An empty list may mean the account lacks access to the site/property; it does not mean the website does not exist.
- Connecting Google at organization level alone does not select a site/property for each project.
Project trash
Manage trashed projects and restore them according to your permissions.
Before you start
- Permission to manage projects.
Step-by-step instructions
- Open Projects → Trash.
- Find the project to restore.
- Read and confirm the action shown, then check the Projects list.
Requirements and notes
- Permanently delete only when the user understands and confirms the consequences.
Work with multilingual websites
Each language has separate data, URL scope and output. Choose the correct language before every action.
Before you start
- A multilingual project group and the URL for each version.
Step-by-step instructions
- Define the language, market and base URL for each version when creating the group.
- Choose the correct language before configuring GSC, crawl, keywords, plans, articles or chatbot.
- Check that URLs belong to the correct version; review canonical, html lang and hreflang under Technical.
- Create and review content for each market. Reusing a brief still requires localization review.
- For chatbot training, select the target language and test answers on the corresponding website.
Requirements and notes
- Do not merge rankings, keywords or GSC figures across languages to fill missing data. Changing the default language does not automatically change canonicals or URL ownership.
SEO strategy & content
17 topicsSEO workflow from data to a published article
Use each stage's output as the next stage's input, then measure results to plan the next cycle.
Before you start
- An existing project, permission to run the relevant stages, and available models and data sources.
Step-by-step instructions
- Add the business profile, URLs/sitemap and knowledge sources; crawl the site and connect Google for actual data.
- Read SEO diagnosis and Market research; verify facts, customers, competitors and missing information.
- Run Strategy and review the Topical Map, keywords, search intent, page types and CTAs.
- Create a monthly Plan and review titles, outlines, goals, categories, knowledge requirements, resources and schedule.
- Create an article from the correct plan item. Read, edit and add sources/images, then run quality checks on the saved revision.
- Push a draft or schedule publication according to WordPress settings. Check the live article after publication, then share to a connected fanpage if appropriate.
- Read Performance, Rank tracking, AI visibility and reports; use the results for the next planning cycle.
Requirements and notes
- Rerunning strategy is not a substitute for updating source data. Do not edit an article while its Writer or QC task is running.
- YMYL content remains a draft for review by a qualified expert.
Overview
A summary of campaign status, plans, performance and issues requiring attention.
Before you start
- Permission to view the tab; running or editing requires separate action permissions.
Step-by-step instructions
- Choose a campaign.
- Open Overview.
- Review metrics and issues, then open the relevant tab.
Requirements and notes
- A newly created campaign may not have data yet.
Business profile
Organization, services/products, team, facilities, certifications and terminology derived from website sources. You can add, edit, delete and restore items.
Before you start
- Permission to view the tab; running or editing requires separate action permissions.
Step-by-step instructions
- Open Shared data → Business profile.
- Check crawl data; generate a profile if needed and permitted.
- Compare each item with actual business information.
- Add, edit or delete incorrect items and check the saved profile.
Requirements and notes
- Manual edits and deletions are saved as decisions and applied to later regenerations.
- Restoring an accidentally deleted AI item may require waiting for the next profile generation.
Crawl
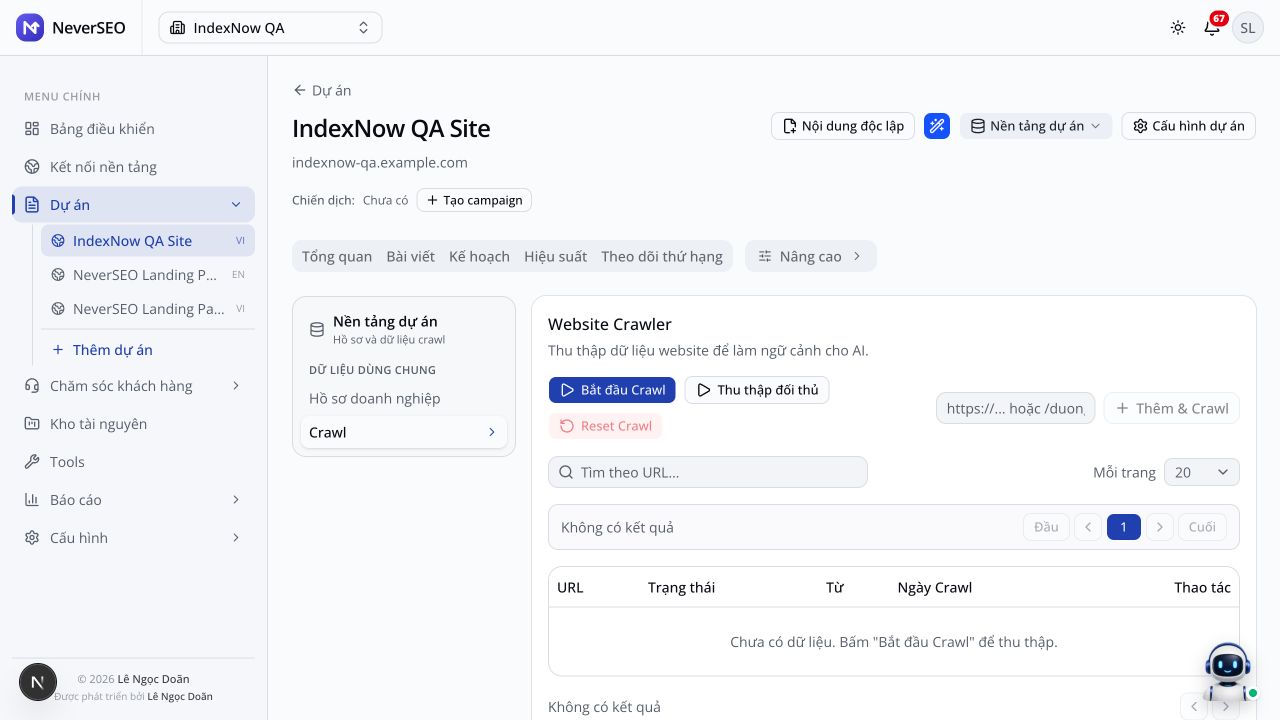
Collect website pages as shared data; track crawled pages, blocked URLs, job status and competitor data.
Before you start
- Permission to view the tab; running or editing requires separate action permissions.
Step-by-step instructions
- Open Shared data → Crawl.
- Check the configured website and sitemap.
- Run a crawl through the page controls if permitted.
- Track the job, inspect collected pages and review why URLs were excluded.
Requirements and notes
- Pages reported unchanged by the sitemap may not be downloaded again; unchanged data remains in storage.
- 429/503 responses may defer a job or cause a rate-limit failure. They do not mean valid pages were deleted.
SEO diagnosis
Analyze the SEO foundation using collected evidence and identify issues and assessments for the campaign.
Before you start
- Permission to view the tab; running or editing requires separate action permissions.
Step-by-step instructions
- Choose a campaign → Campaign foundation → SEO diagnosis.
- Check input data.
- Run diagnosis if permitted and track the task.
- Read the results and priority issues.
Requirements and notes
- AI makes assessments; metrics must have real sources. AI tasks may consume quotas and tokens.
Market research
Research markets, customers, competitors, SWOT, content gaps and trends. Coverage, source excerpts, dates and verification status are retained for strategy handoff.
Before you start
- Permission to view the tab; running or editing requires separate action permissions.
Step-by-step instructions
- Choose a campaign → Campaign foundation → Market research.
- Check the target market and data sources.
- Run research if permitted.
- Read Research sources and Research coverage. Open View findings & source excerpts to check URLs, quotes, source dates and inferences before building strategy.
Requirements and notes
- Web evidence does not verify every conclusion. A matching excerpt proves what a source said; inferences still need checking.
- Up to three competitors with sources are retained. Missing evidence or name/domain mismatches must remain unverified; do not invent competitors to meet a count.
- Research is capped at 12 queries, 24 search requests and 14 page reads; new operations stop after roughly two minutes. Pages requiring JavaScript may be unreadable in that run.
- Web research uses SearXNG first, then configured providers in fallback order with the shared key pool. Missing keys or exhausted quotas do not indicate a lack of market demand.
- Updating the content store does not reset source age. Market research may be reused for up to 90 days; trend sources need rechecking after seven days and publication dates within 30 days. Incomplete coverage snapshots wait one day before another automatic supplement. Explicit research runs still require permission and quota.
- Unknown publication dates must remain unknown; observation dates do not replace publication dates. Language and time filters depend on the provider and have their own limits.
- Competitor excerpts remain separate in research snapshots and are not added to the conversation knowledge base.
Strategy
Content direction, personas, CTAs, Topical Map and roadmap based on the existing foundation and inputs.
Before you start
- Permission to view the tab; running or editing requires separate action permissions.
Step-by-step instructions
- Choose a campaign → Campaign foundation → Strategy.
- Complete the inputs requested by the interface.
- Run strategy if permitted.
- Read the roadmap, topic clusters and direction before creating a plan.
Requirements and notes
- Strategy is not a monthly publishing calendar; the monthly plan is the next stage.
- Strategy and Planner receive research verification status, coverage and dates. AI confidence does not replace source evidence. Writer receives only article context appropriate to its role.
Keywords
View campaign keywords, Topical Map, intent, clusters and sourced metrics.
Before you start
- Permission to view the tab; running or editing requires separate action permissions.
Step-by-step instructions
- Choose a campaign → Campaign foundation → Keywords.
- Review topic clusters and keywords.
- Compare intent, volume and rankings when data exists.
- Use strategy and clusters to build a plan.
Requirements and notes
- Blank volume, keyword difficulty or rankings mean missing data, not zero.
Plan
Create and manage monthly content plans with article briefs, categories, links and resources.
Before you start
- Permission to view the tab; running or editing requires separate action permissions.
Step-by-step instructions
- Choose a campaign → Plan.
- Select a month or create a plan using the page controls.
- Enter requirements or adjustments and answer Planner's questions if asked.
- Track the task, then open the plan to review article rows and handoff.
Requirements and notes
- Article N in month M means the article's position in that plan, not a publication date of N/M.
- Planner requires strategy inputs according to the interface's gates.
Monthly plan details
Five areas: Plan & Articles, Categories, Resources & Media, Topic Matrix and Internal links. Edit or review plans and track processing.
Before you start
- Permissions for the plan and relevant section.
Step-by-step instructions
- Open Plan and select the correct month.
- In Plan & Articles, review article IDs, briefs and writing/publishing actions.
- Use Categories to match CMS taxonomy.
- Use Resources & Media to read briefs and add images or videos.
- Use Topic Matrix and Internal links to check coverage and linking.
Requirements and notes
- Visible sections and actions depend on permissions. A media role does not automatically grant access to article content.
Articles
Work on articles from monthly plans: write, edit, run QC, manage resources and publish according to permissions.
Before you start
- Permission to view the tab; running or editing requires separate action permissions.
Step-by-step instructions
- Choose a campaign → Articles and the required plan/month.
- Select the correct article row and read its brief before writing.
- Start writing if permitted and wait for the task.
- Open the article to read, edit, check QC/SEO and prepare publication.
Requirements and notes
- Writing consumes quotas and tokens. A request for instructions is not authorization to run a task.
- The assistant does not overwrite an existing article with a chat writing command.
Independent content
A project content workspace separate from campaign plans.
Step-by-step instructions
- Open Independent content in the project.
- Review the content and actions available to you.
- Select the item, provide a complete brief and track processing status.
Requirements and notes
- Do not assume content has been written or published without a completed task result.
Edit, check and publish an article
Read and edit content and metadata, check quality and SEO, manage images/resources and publish through CMS settings. Once a WordPress article is public and the project has a connected fanpage, share an image and caption to Facebook Page with a comment linking to the website.
Before you start
- writer/qc/publish permissions and a configured CMS.
- Facebook sharing requires publish permission, a Page connected to that exact project, an active project and an organization allowed to write. Meta requires pages_manage_posts for photo posts and pages_manage_engagement for comments.
Step-by-step instructions
- Open the correct article from the plan or Articles.
- Read the content, correct inaccurate information and save changes.
- Check QC and blocking SEO errors.
- Add resources and images according to the brief.
- Check the CMS and publication mode, then publish or schedule if permitted.
- After pushing a WordPress draft, publish it publicly in WordPress. If Check public article for sharing appears, click it or reload to verify. Draft, private, password-protected articles or articles not verifiable through the WordPress API will not show a sharing button.
- Click Share to Facebook Page. AI uses the Writer model and the actual public WordPress content to draft a caption and invitation to read in the project language.
- In the dialog, choose the project's Facebook Page and one thumbnail or in-content image. Edit Caption and the invitation in the comment. The system automatically adds the public WordPress URL.
- Check the image, caption, Page and comment, then click Post image and add comment. The system posts the image with its caption and then adds the invitation comment with the public link. Check the Facebook post and Article sharing history in the dialog.
Requirements and notes
- Editing an article requires rechecking old QC results against its fingerprint/revision.
- YMYL projects are restricted to drafts; enabling live publication cannot bypass this gate.
- The focus keyword labels the content; it is not a reason to stuff keywords.
- The agent keeps published article slugs stable. Manually changing a live URL requires intent and a redirect plan.
- Only publicly published WordPress articles can be shared, not products. Currently one HTTPS thumbnail or in-content image is supported; multiple images, videos, scheduling, editing and deleting Facebook posts are not supported.
- AI captions require a configured Writer model and AI budget. If AI fails, you can enter the caption and invitation manually. Editing the caption does not change website content.
- If Meta permissions are missing, reconnect Facebook in Platform connections and click Update connection permissions under Settings → Social networks. Business Login must also be configured for these posting and commenting permissions.
- Facebook post and comment results are stored separately. A comment failure does not repost the article. If connectivity is lost or the outcome is unclear, check Facebook and history before manually posting or commenting again. The system does not automatically retry public requests.
Publishing categories
Manage project content categories and match CMS taxonomy so articles publish in the right place.
Step-by-step instructions
- Open the project → Categories.
- Review existing categories.
- Add, edit or match them to the CMS using page tools.
- Check the category in the plan row before publishing.
Requirements and notes
- System categories and CMS categories must be matched; do not assume they are identical.
Connect WordPress and set publishing mode
Configure the WordPress CMS connection using its URL, username and Application Password, and set project publishing mode and content risk.
Before you start
- manage_projects permission and a WordPress account with the required publishing privileges.
Step-by-step instructions
- In WordPress, open Users → Profile → Application Passwords and create an Application Password for an appropriately authorized account.
- In NeverSEO, open the project → Project settings → Integrations, then the CMS/WordPress section.
- Enter the WordPress website address without /wp-admin or /wp-json, the WordPress username and Application Password in the configuration form.
- Select automatic publishing mode: push drafts only or publish publicly according to settings and permissions. Mark YMYL content when relevant.
- Click Save connection, then Test connection.
- After connection succeeds, check categories, articles, QC and resources before publishing or scheduling.
Requirements and notes
- Do not use your main sign-in password or send the Application Password in chat.
- YMYL projects always stop at drafts, even if immediate public publication is selected.
- Platform defaults apply only to new projects; existing projects have their own mode.
- Push draft to WP creates a draft. Publish it publicly in WordPress before Facebook sharing, then reopen the article or click Check public article for sharing.
Landing Page optimization
Assess a landing page and recommend improvements using project data and context.
Before you start
- Permission to view the tab; running or editing requires separate action permissions.
Step-by-step instructions
- Open the project/campaign → Landing Page optimization.
- Check the landing page URL and context.
- Run optimization if permitted.
- Read recommendations and compare them with the actual page.
Requirements and notes
- Recommendations do not automatically modify the website without a separate applicable publishing action.
Prepare images and resources for an article
Prepare media according to the brief and check relevance and usage rights before publishing.
Before you start
- A plan item or article and resource permissions.
Step-by-step instructions
- Open the correct plan item or article → Resources & Media and read the image purpose and requirements.
- Prepare a thumbnail and add body images when the content needs explanation, illustration or evidence.
- Upload or select existing assets. For AI images, check the separately configured image-generation model.
- Review image content, copyright, description/alt text and fit with the article passage before inserting it.
- Check the preview and featured image after pushing the article to WordPress.
Requirements and notes
- Do not add images just to meet a count. Operators must verify usage rights; an existing image does not prove it is licensed.
Monitoring & optimization
08 topicsTechnical
Technical audits, evidence, changes and crawl/index decisions to improve website health.
Before you start
- Permission to view the tab; running or editing requires separate action permissions.
Step-by-step instructions
- Choose a campaign → Advanced analysis → Technical.
- Check data and crawl timestamps.
- Run a technical audit if permitted.
- Read issues and diffs, fix the website and check again.
Requirements and notes
- Audits do not automatically fix the CMS or website. Do not invent issues when sources are missing.
Off-page
Analyze off-site signals and recommend off-page actions based on collected sources.
Before you start
- Permission to view the tab; running or editing requires separate action permissions.
Step-by-step instructions
- Choose a campaign → Advanced analysis → Off-page.
- Check signals and sources.
- Run analysis if permitted.
- Read recommendations and compare them with backlink evidence.
Requirements and notes
- The system does not guarantee automatic backlink purchases or placements.
Performance
Track and analyze search and website performance using connected data and history.
Before you start
- Permission to view the tab; running or editing requires separate action permissions.
Step-by-step instructions
- Choose a campaign → Performance.
- Check that Google and data sources are connected.
- Read metrics with their timestamps and scope.
- Run performance analysis if permitted and review recommendations.
Requirements and notes
- Do not infer revenue from clicks or traffic.
AI visibility
Check and analyze brand and content visibility in AI answers.
Before you start
- Permission to view the tab; running or editing requires separate action permissions.
Step-by-step instructions
- Choose a campaign → Advanced analysis → AI visibility.
- Check configuration and queries through the interface.
- Run checks if permitted.
- Read the results and observation timestamps.
Requirements and notes
- One check does not guarantee that every model or query mentions the brand.
Competitors
View competitors, collected data and content gaps with clearly identified competitor sources.
Before you start
- Permission to view the tab; running or editing requires separate action permissions.
Step-by-step instructions
- Choose a campaign → Advanced analysis → Competitors.
- Check that competitors match the market and language.
- Read snapshots and content gaps.
- Compare them with your website's content before planning.
Requirements and notes
- Competitor data is not your website's metrics and must not be granted to the customer advice widget.
Backlinks
View external link evidence, snapshots and measured changes.
Before you start
- Permission to view the tab; running or editing requires separate action permissions.
Step-by-step instructions
- Choose a campaign → Advanced analysis → Backlinks.
- Check data sources and timestamps.
- Review links and changes.
- Verify actual URLs before drawing conclusions.
Requirements and notes
- Do not estimate backlink counts without a provider or data.
Rank tracking
Track keyword positions across measurements in the relevant market.
Before you start
- Permission to view the tab; running or editing requires separate action permissions.
Step-by-step instructions
- Choose a campaign → Rank tracking.
- Check keywords and the target market.
- Read positions and measurement timestamps.
- Compare measurements within the same scope.
Requirements and notes
- Rankings vary by location, language and time; they are not fixed results.
Business outcomes from the widget
Reconcile widget requests into qualified leads or appointments to measure actual business outcomes.
Before you start
- Permission to view and update project outcomes.
Step-by-step instructions
- Open Project settings → Business outcomes → reconciliation table.
- Select the request to verify.
- Update actual outcomes using permitted actions.
- Compare the results with the report.
Requirements and notes
- A customer's appointment request does not mean an appointment has been confirmed.
Chatbots & customer support
09 topicsCustomer service
Handle conversations, Messenger, submitted forms, customer profiles, chatbot training and settings.
Before you start
- inbox permission.
Step-by-step instructions
- Open Customer service.
Inbox, Messenger, Forms, Customer profiles, AI training and Settings are in the Customer service navigation.Click the image to view it at full size. - Select Inbox, Messenger or the area you need.
- Select a project when the data belongs to a specific website.
Requirements and notes
- The operational SEO Assistant is different from the customer-facing chatbot on the website.
Website assistant settings
Configure Assistant, Website (widget settings), Social networks, Responsible team and AI training. The assistant has a model, greeting, tone, additional instructions and source access, including public websites from selected projects in the same organization.
Before you start
- manage_projects permission.
Step-by-step instructions
- Open Settings and select a project.
- In Assistant, adjust the model, greeting, tone, instructions and accessible sources.
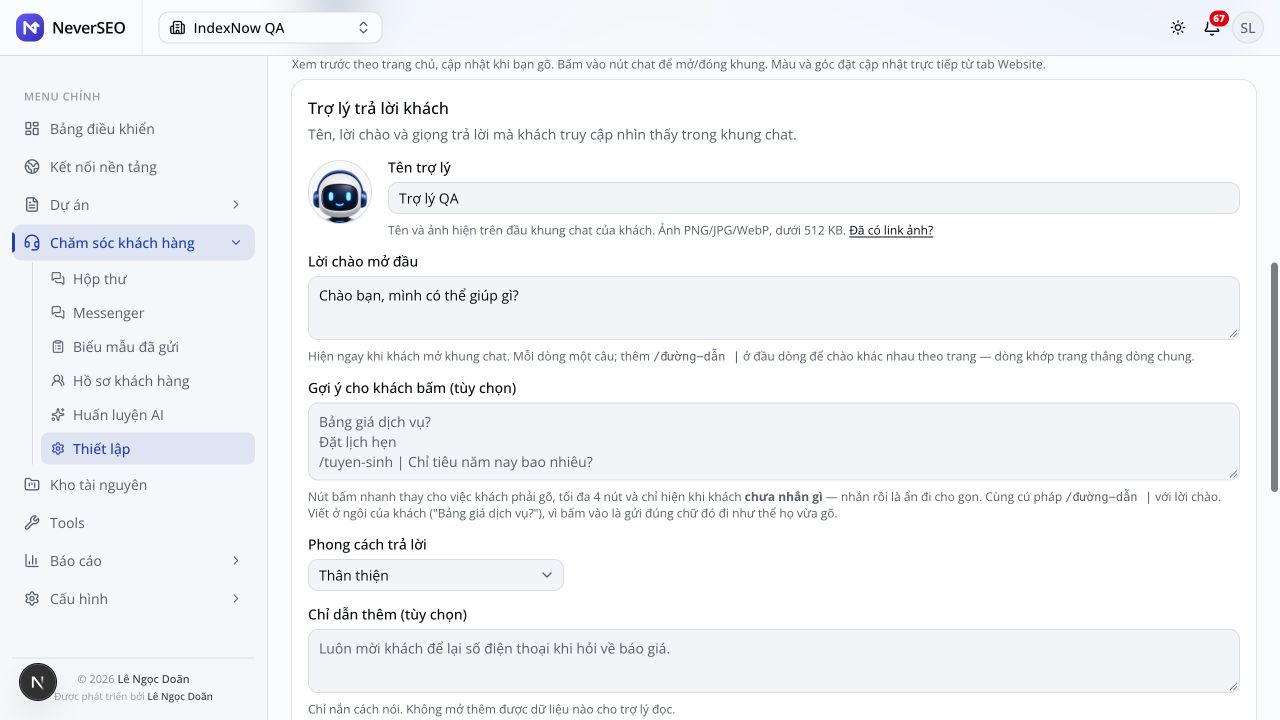
In the Assistant tab, edit the name, greeting, visitor suggestions and response style.Click the image to view it at full size. - To use another website's data, select the receiving project. In Assistant → Data the assistant can read → Data from other projects, choose up to three source projects and click Save in Assistant. Only active, enabled projects with HTTPS websites in the same organization appear.
- In Website, get the embed instructions or configure WordPress, then test the widget on the website.
- Choose the customer contact channels and notification email recipients.
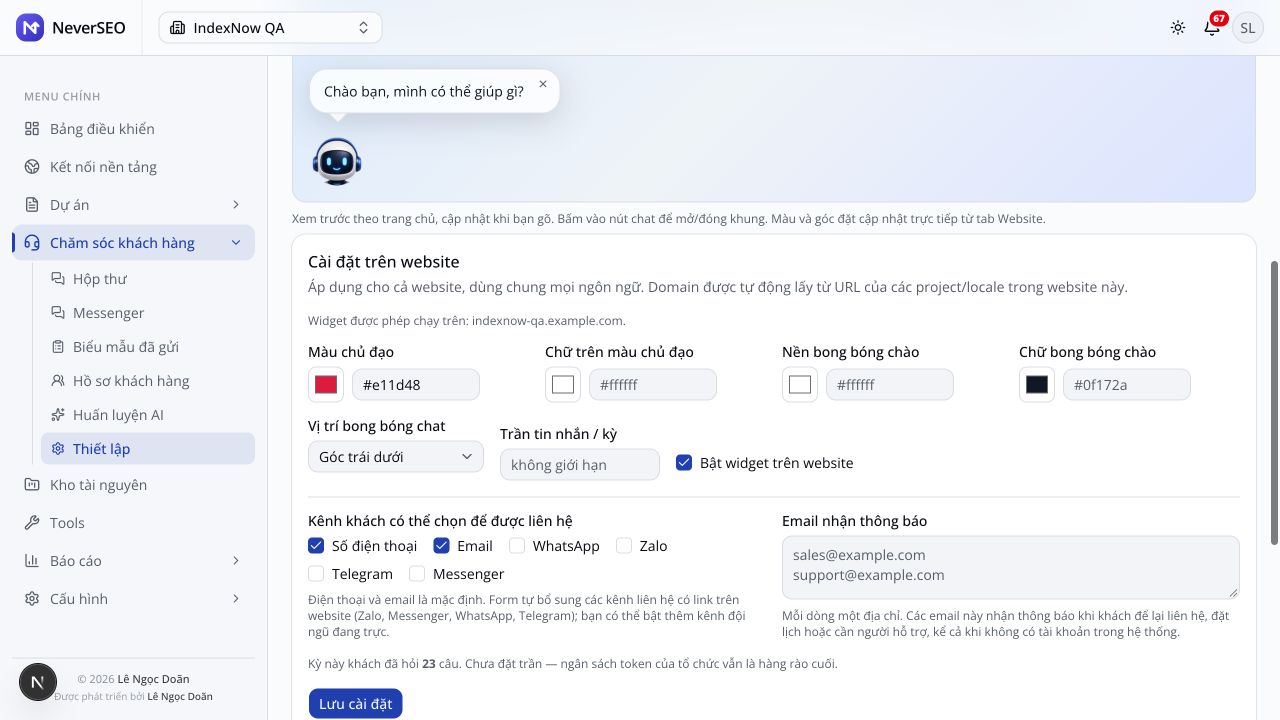
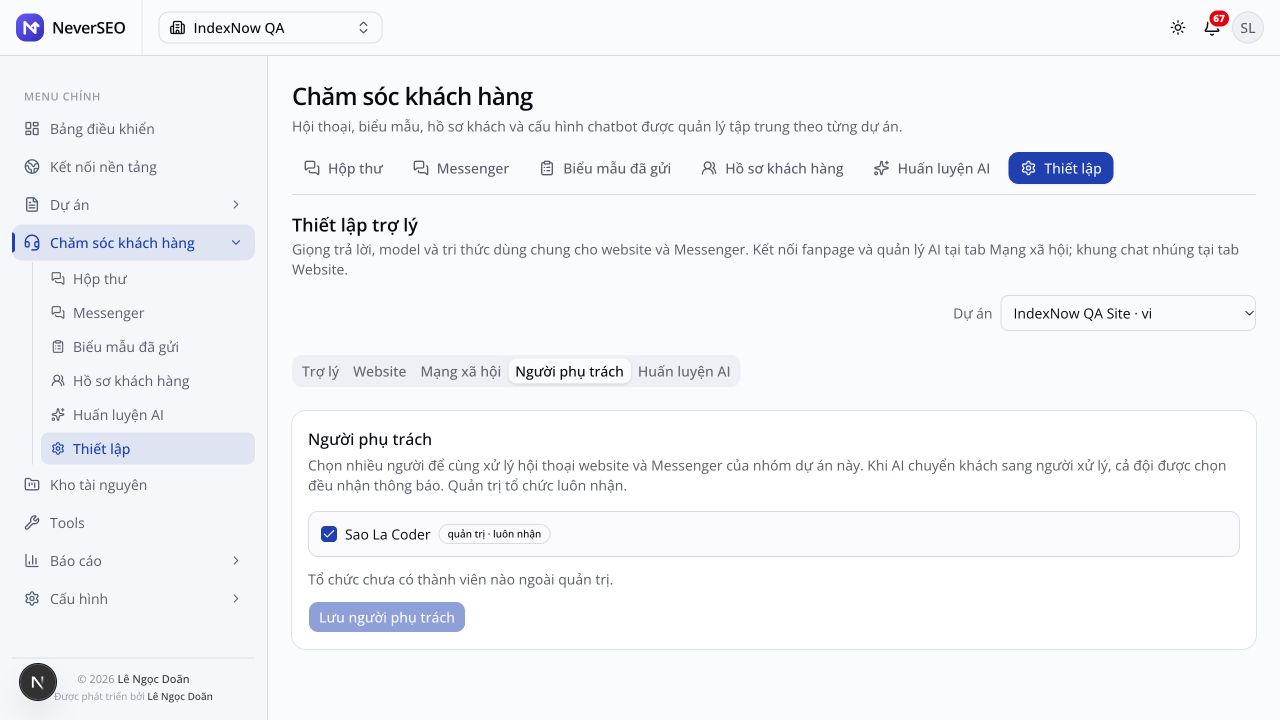
Website tab: choose contact channels and notification emails, enable the widget and click Save settings.Click the image to view it at full size. - Check the responsible team, save settings and try an actual conversation.
Assigned team tab: select members to handle conversations. This example has only the administrator, so the save button is disabled.Click the image to view it at full size. - In the chat contact form, customers choose a channel from horizontal options; the field below changes with the selected channel.
- The form automatically adds channels linked on the website for that language: phone, email, Zalo, Messenger, WhatsApp and Telegram. Website settings can enable additional channels staffed by your team.
- The widget message textarea expands with its content, with a minimum height matching the send button. Enter sends a message; Shift+Enter adds a line break.
Requirements and notes
- Website sources must be owned and explicitly granted. Do not arbitrarily grant internal documents.
- Image-generation models and language models are separate configurations.
- If the customer assistant model fails at the provider, the system immediately tries configured fallback models, up to two. If no model is available or validation fails, it hands over to the responsible team.
- A provider-confirmed model-specific quota temporarily suspends only that model on the relevant key; a default model sharing the key may still be tried. Key, authentication, billing or limits with unknown scope suspend that key for all models. Organization budget limits still block requests before AI is called.
- Contact links are checked on website and contact pages in the same language and cached for up to one hour. If the website does not respond, the form uses configured channels; mentioning an app in an article does not establish a contact channel.
- Sharing reads existing data directly: public owned crawl pages within the source project's URL scope, public business profile and published article titles/links. Selecting sharing does not trigger recrawling or re-embedding. Outdated crawl data still needs updating in the source project.
- Source-project AI training/additional documents, competitor content, internal SEO data, drafts, conversations and customer profiles are not shared. A published article list alone does not verify its content or prices.
- Permission is one-way on the receiving project. It does not grant reverse access or access to projects linked by a source. It does not apply to Writer, Planner or Strategy or add widget embed domains. Website and Messenger share this project's assistant source permissions.
- The source project does not need its own widget enabled. Deselect and save to revoke access. Disabled or invalid sources block reads; an admin must remove unavailable selections. If permissions change while an answer is being generated, the old result is not sent.
- Plan, price and terms from a linked website retain their provenance. The assistant does not replace landing-page prices with another site's prices. Conversations, responsible team, message limits and AI usage remain with the receiving project.
- Website and Messenger assistants can answer general questions beyond the industry, but business-specific facts require granted sources. Answers undergo source and content review. Missing owned facts trigger further retrieval; if still missing or validation fails, the conversation is handed over.
- Customer-facing citations use page/article names and public URLs. Source code and business-profile keys are filtered from answers, quick choices and form labels; widget history is also filtered when reloaded.
- Health, religion and violence topics receive safe explanations with appropriate sources, not personal diagnosis, prescriptions or treatment decisions. Comparisons require a customer request and evidence for both sides. Additional instructions cannot relax these limits. Messages judged spam in context may be ignored.
Install the chatbot on a website
Install the widget using the NeverSEO WordPress plugin or an embed snippet for other websites, with website and language settings.
Before you start
- manage_projects permission and access to edit the website or plugins.
Step-by-step instructions
- Open Customer service → Settings and select the correct project.
- In Assistant, enable the assistant for the required language and configure appropriate sources and models.
Step 2 · Configure the assistant before embedding it on your website.Click the image to view it at full size. - In Website, enable and configure the website, then save once to generate the key and embed snippet if they do not exist.
Step 3 · Enable the website widget and save settings. The Install widget section is below this area; use the WordPress plugin or embed code as described in steps 4–5.Click the image to view it at full size. - For WordPress, install the NeverSEO plugin, open Settings → NeverSEO, enter the organization API key in the plugin page, enable Website chatbot and click Connect.
- For other websites, click Copy embed snippet and insert it before the website's </body> tag.
- Open the actual website, check the chat bubble and ask a test question. Changes to color, position, avatar and model in the system propagate without pasting the snippet again.
Requirements and notes
- Both the website and language must be enabled.
- Do not share API keys in conversations; enter them only in integration settings.
- If the embed snippet is missing, check that the Website tab has been saved.
- For a landing widget to read the main website, select sources in Assistant → Data from other projects on the landing project and use the landing's own widget. Selecting a source does not change allowed embed domains or import main-site data into the landing project.
Train the AI chatbot
Add prices, policies, FAQs, processes and business documents for the website chatbot by project and language. Supports text, PDF, DOCX, XLSX, CSV, TXT and web/Google Docs links.
Before you start
- An available website project and permission to manage sources.
Step-by-step instructions
- Open AI training and select a project.
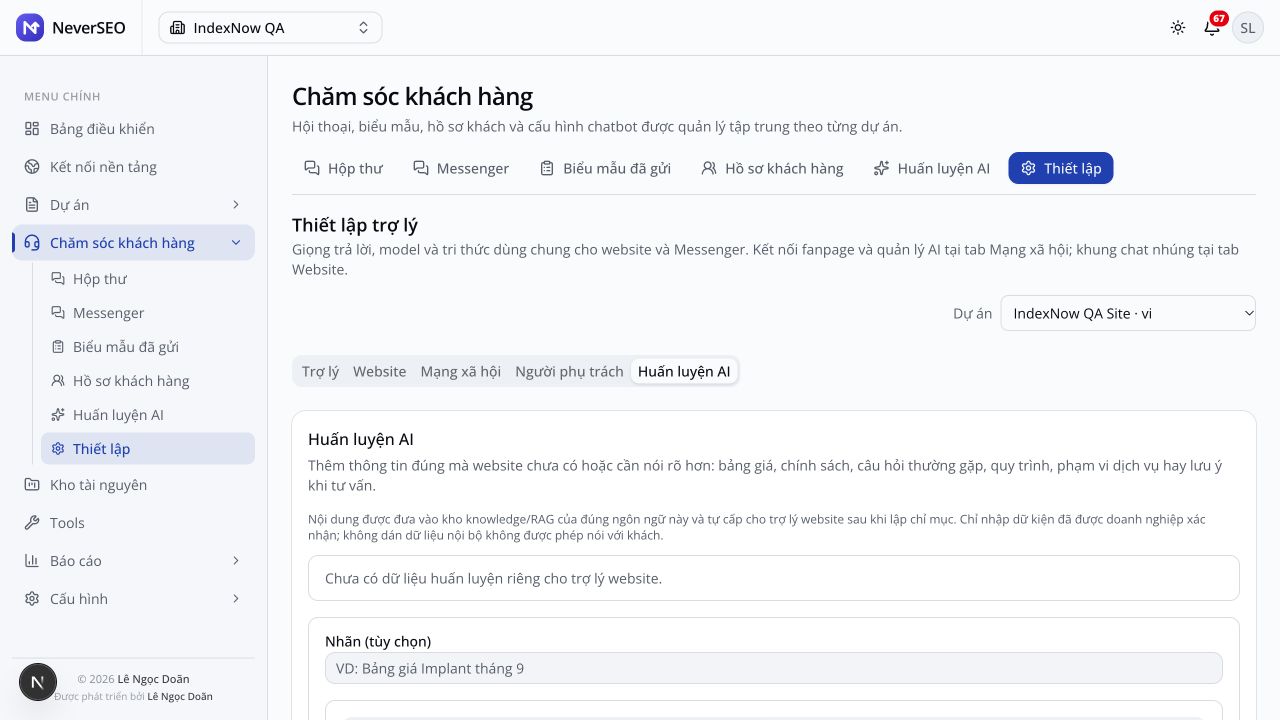
Open AI training from the menu or from the project Settings tab.Click the image to view it at full size. - Choose the website language if multiple versions exist.
- Add sources as text, files or links in the source manager.
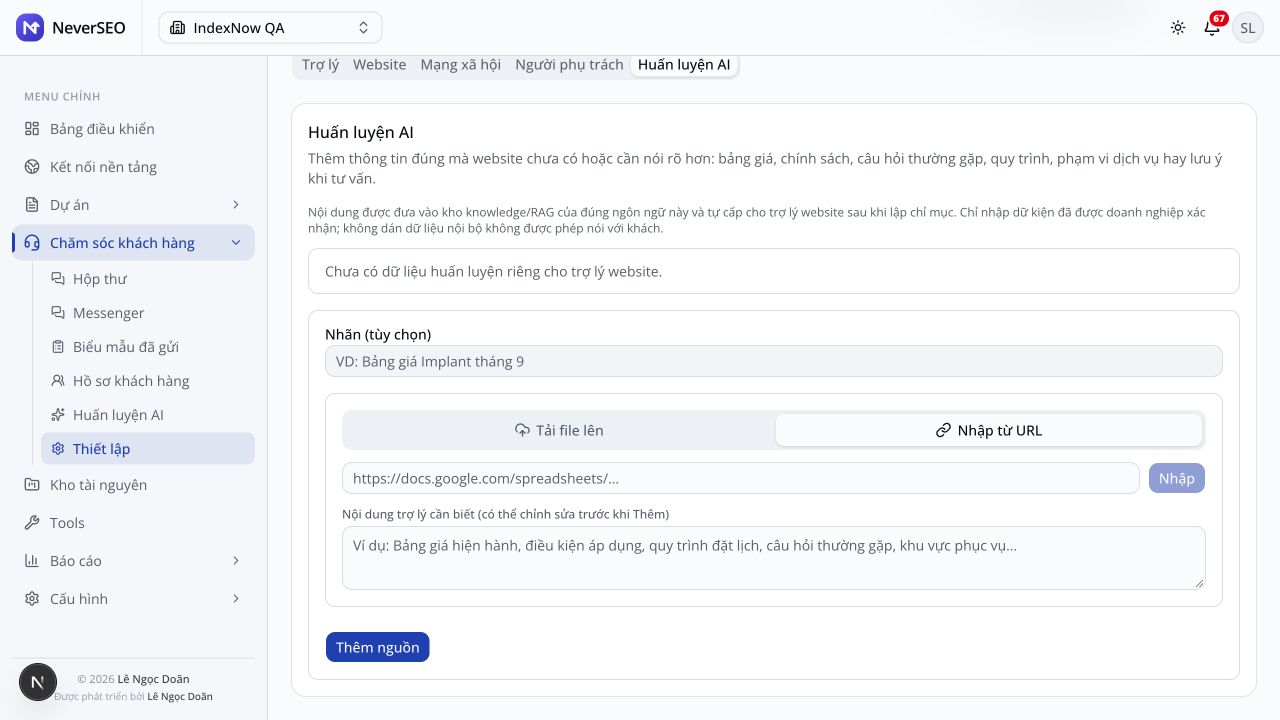
Step 3 · Select Import from URL, enter a link and click Import; review the content before clicking Add source.Click the image to view it at full size. - Use accurate content with clear conditions and effective dates, then save.
- Wait for processing/vectorization to finish, then ask the chatbot about the added facts.
Requirements and notes
- Training here updates RAG knowledge; it does not fine-tune the model.
- This is business knowledge for the customer chatbot, not the SEO Assistant's software usage manual.
Widget inbox
Read and support conversations from website widget visitors, with context and customer information scoped to the project.
Before you start
- inbox permission.
Step-by-step instructions
- Open Customer service → Inbox.
- Select the project and conversation to handle.
- Read history, context and information provided by the customer.
- Use reply and customer service actions permitted in the interface.
Requirements and notes
- The assistant reads only owned project sources and granted public websites from projects in the same organization; it does not read competitor content or unapproved internal documents.
- The old /inbox URL redirects to /customer-service/inbox.
Submitted forms
Track appointment, consultation, quote, support and callback requests; filter by project, request type and service progress.
Before you start
- inbox permission.
Step-by-step instructions
- Open Submitted forms.
- Select a project, request type and service progress, then click Filter.
- Click View and process for the request to handle.
- Check the contact channel and the customer's preferred time.
- Open the conversation to reply and update progress.
- Contact details retain Channel: value format. Click the value to call, compose email or open WhatsApp, Zalo, Telegram or Messenger according to the recorded channel. Opening a link does not send a message or confirm an appointment.
Requirements and notes
- A requested date/time is not a confirmed appointment.
- The contact channel follows the customer's choice; do not infer WhatsApp from a phone number.
- Links are created only from unambiguous details: WhatsApp needs a country-coded number; Zalo uses a Vietnamese number or provided zalo.me link; Telegram/Messenger use a suitable username or account link. Display names, short numbers or unclear channels remain text. Account existence and messaging availability are not guaranteed.
Process a submitted form
Review submitted fields, contact details, processing errors and New / In progress / Completed status.
Step-by-step instructions
- Open View and process for the form.
- Read the customer's submitted data.
- Mark In progress when taking responsibility.
- Open the conversation to reply.
- Mark Completed when the work is finished.
- Notification emails place View form and Open conversation buttons on one row. View form opens the latest submitted form in the correct conversation.
- Contact details retain Channel: value format. Click the value to call, compose email or open WhatsApp, Zalo, Telegram or Messenger according to the recorded channel. Opening a link does not send a message or confirm an appointment.
- Notification emails also allow clicking contact values directly under Customer information; other fields, such as appointment date and customer name, remain text.
Requirements and notes
- Marking Completed does not automatically confirm an appointment or send a reply.
- Links are created only from unambiguous details: WhatsApp needs a country-coded number; Zalo uses a Vietnamese number or provided zalo.me link; Telegram/Messenger use a suitable username or account link. Display names, short numbers or unclear channels remain text. Account existence and messaging availability are not guaranteed.
Customer profiles
Customer profiles derived from conversation and behavior data, contact details and interests.
Before you start
- inbox permission.
Step-by-step instructions
- Open Customer profiles.
- Select a project and use available filters or search.
- Open a customer to compare information and history.
- Contact details retain Channel: value format. Click the value to call, compose email or open WhatsApp, Zalo, Telegram or Messenger according to the recorded channel. Opening a link does not send a message or confirm an appointment.
Requirements and notes
- Interests inferred from behavior are not explicit customer confirmation.
- Links are created only from unambiguous details: WhatsApp needs a country-coded number; Zalo uses a Vietnamese number or provided zalo.me link; Telegram/Messenger use a suitable username or account link. Display names, short numbers or unclear channels remain text. Account existence and messaging availability are not guaranteed.
Customer profile details
View customer information, interests and related data for customer service.
Step-by-step instructions
- Open a customer from the profile list.
- Check contact details and their recorded sources.
- Review conversations and history before providing support.
- Contact details retain Channel: value format. Click the value to call, compose email or open WhatsApp, Zalo, Telegram or Messenger according to the recorded channel. Opening a link does not send a message or confirm an appointment.
Requirements and notes
- Do not invent missing information or use another customer's data.
- Links are created only from unambiguous details: WhatsApp needs a country-coded number; Zalo uses a Vietnamese number or provided zalo.me link; Telegram/Messenger use a suitable username or account link. Display names, short numbers or unclear channels remain text. Account existence and messaging availability are not guaranteed.
Facebook & Messenger
03 topicsSocial network settings
Manage fanpage connections, AI replies and email notifications. Sharing articles to Facebook is done on the project's article page.
Before you start
- manage_projects and inbox permissions; the fanpage must be assigned to an active project to save email settings.
Step-by-step instructions
- Connect Facebook in Platform connections.
Step 1 · Connect your Facebook account in Platform connections when the provider is enabled.Click the image to view it at full size. - Open Customer service → Settings → Social networks and choose a project.
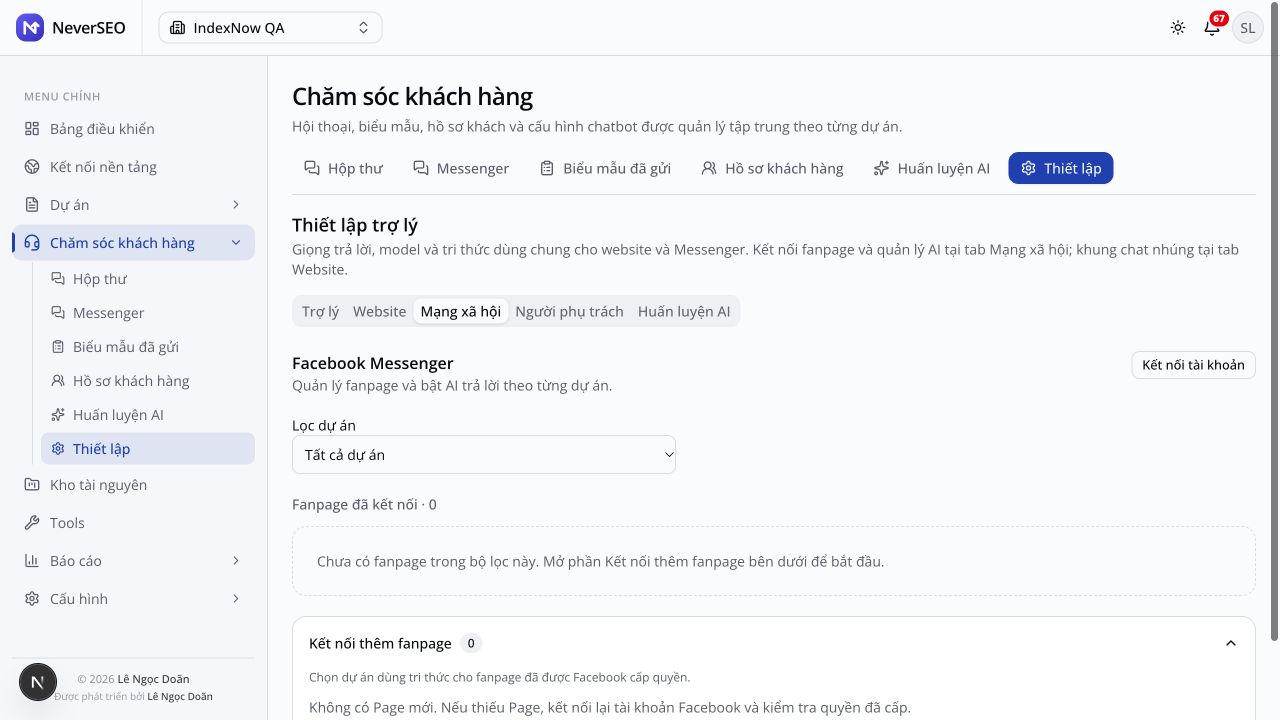
Step 2 · Social media tab: filter projects and open Connect another fanpage. No Page is connected in this example; connect your account and grant permissions before selecting a Page.Click the image to view it at full size. - For a connected fanpage, enable or disable Send email notifications.
- Choose the sending condition: When human handling is needed or When a new customer message arrives.
- Enter up to ten notification email addresses, separated by line breaks, commas or semicolons. Leave blank to notify the responsible team and admins; a custom list sends only to that list.
- Click Save email notifications, check connection status and test a Messenger conversation.
- If permissions or tokens are outdated, open Manage connections and click Update connection permissions after granting new Facebook permissions.
- To share an article, open Projects → Articles → select a publicly published WordPress article, then click Share to Facebook Page. The Page must belong to the same project.
Requirements and notes
- Completing OAuth alone does not guarantee a selected fanpage with messaging permissions.
- By default, email is enabled when human handling is needed. Settings are independent for each fanpage and do not use the Website tab's email list.
- When a new customer message arrives sends email for incoming customer messages even when AI can answer; it does not send an additional handover email in the same mode. Duplicate webhooks for the same message are deduplicated.
- Disabling email preserves in-app attention notifications. Queued emails are rechecked before sending; disabling email, changing conditions, removing recipients, disconnecting a Page or pausing the project cancels emails that are no longer valid.
- Emails include fanpage, project, conversation and inbox links, use platform SMTP and require a running worker. Failed queued emails are retried.
- If multiple Facebook connections grant the same Page, the most recently updated connection has priority. Update the Page token before publishing if it still belongs to an older connection.
- Social networks manages connections and customer service only. AI captions, image selection, publishing and website-link comments are on the article page.
Fanpage Messenger
A Messenger inbox for connected fanpages, supporting conversation handling and team assignment.
Before you start
- inbox permission and a connected fanpage.
Step-by-step instructions
- Connect Facebook in Platform connections.
Before using the Messenger inbox, connect a Page and assign its project in Settings → Social media.Click the image to view it at full size. - Select a fanpage under Settings → Social networks.
- Open Messenger and select a fanpage and conversation.
- Check assignment and status before replying with permitted actions.
- To change email notifications, open Settings → Social networks, edit Send email notifications, Sending condition and Notification email recipients for the fanpage, then click Save email notifications.
Requirements and notes
- Fanpage Messenger is different from the experimental Personal messaging assistant.
- The fanpage needs messaging permissions and an available connection configuration.
- AI replies use the same sources and validation as the project's website assistant, including granted linked websites. Messenger sends text only. When human handling is needed, it hands over and notifies staff rather than emitting widget forms or automatically sending promises/fallback messages to customers.
- Email defaults to human handover notifications. You can disable it or choose new-message notifications separately for each fanpage. In-app notifications for the responsible team and admins remain when email is disabled.
Share a WordPress article to a fanpage
Draft a caption, choose an image and add a comment linking to the public article.
Before you start
- A publicly published WordPress article and a fanpage assigned to the same project; publishing permission and Meta posting/commenting permissions.
Step-by-step instructions
- Connect Facebook in Platform connections. Select the Page and project in Customer service → Settings → Social networks; update connection permissions if the token is old.
Step 1 · Check the Page connection and project in the Social media tab before sharing an article. This screenshot shows the connection area, not the publishing dialog.Click the image to view it at full size. - Open the published article in Projects → Articles. If sharing is missing, click Check public article for sharing or reload the article page.
- Click Share to Facebook Page and review the AI caption and invitation against WordPress content. You can enter them manually if AI is unavailable.
- Choose the Page and one thumbnail/in-content image, then edit Caption and the invitation comment. The WordPress link is added automatically.
- Check the preview and click Post image and add comment. Open the Facebook post and review Article sharing history.
- If the comment fails but the post succeeds, check history and Facebook before continuing to avoid duplicate posts.
Requirements and notes
- Currently supports one HTTPS image and public WordPress articles, not products, multiple images, video, scheduling or Facebook post editing/deletion.
- Changing the caption does not edit the website article. A permitted user must check the content and Page before publishing publicly.
Tools & resources
09 topicsResources
Manage images, videos and files for content and media handoff.
Before you start
- resources/media permissions.
Step-by-step instructions
- Open Resources.
- Choose the scope and filters on the page.
- Find or add resources according to your permissions.
- Compare the article or plan brief before attaching resources.
Requirements and notes
- Resources may belong to a plan or project and are not automatically public.
Tools
Standalone tools: Site Explorer, Deep search and Personal messaging assistant. Keywords Explorer, Content Explorer and standalone Site Audit are currently planned.
Before you start
- Permission to view Tools; individual tools may require additional permissions.
Step-by-step instructions
- Open Tools.
- Choose a tool marked Ready.
- Provide input and run it according to its instructions.
- Read results with their sources, timestamps and scope.
Requirements and notes
- Do not present planned tools as operational.
- Standalone Site Audit is not available yet; the project's Technical tab is a separate feature.
Site Explorer
Verify technical signals and public website coverage through a standalone tool with history and sources.
Before you start
- Tool permissions and available sources.
Step-by-step instructions
- Open Tools → Site Explorer.
- Enter the website and parameters in the form.
- Run the measurement and track progress.
- Review results, sources, timestamps and areas with missing data.
Requirements and notes
- Missing data is not zero.
Deep search
Find people or research information across multiple sources; compare criteria and retain evidence and separate research profiles.
Before you start
- Tool permission.
Step-by-step instructions
- Open Deep search → New search.
- Choose Find people or Research information.
- Enter known clues and criteria without adding unconfirmed facts.
- Run the search and track progress.
- Read evidence and fit assessments, and verify identity before saving a profile.
Requirements and notes
- Similar clues do not guarantee the same person.
- Blocked or inaccessible sources must retain their actual status.
- Key pools, fallback source ordering and web-search cooldowns are shared with SEO research. This does not mean every source is called in every run. Dedicated people/social connectors retain separate scopes.
Case research profile
View profile details and evidence within a research case.
Before you start
- Permission to view the specific profile.
Step-by-step instructions
- Open Deep search.
- Select a case, profile or knowledge item you are authorized to view.
- Read its content and sources; return to research for additional information when needed.
Requirements and notes
- Private research profile scope is checked on the server.
Saved research profiles
View saved profiles to continue research and verification.
Before you start
- Permission to view the specific profile.
Step-by-step instructions
- Open Deep search.
- Select a case, profile or knowledge item you are authorized to view.
- Read its content and sources; return to research for additional information when needed.
Requirements and notes
- Private research profile scope is checked on the server.
Research knowledge base
Retrieve knowledge and evidence from independent research.
Before you start
- Permission to view the specific profile.
Step-by-step instructions
- Open Deep search.
- Select a case, profile or knowledge item you are authorized to view.
- Read its content and sources; return to research for additional information when needed.
Requirements and notes
- Private research profile scope is checked on the server.
Research knowledge details
Read a research knowledge item in detail and its associated evidence.
Before you start
- Permission to view the specific profile.
Step-by-step instructions
- Open Deep search.
- Select a case, profile or knowledge item you are authorized to view.
- Read its content and sources; return to research for additional information when needed.
Requirements and notes
- Private research profile scope is checked on the server.
Personal messaging assistant
Connect personal Messenger accounts, keep context for each person and assist with messaging. The browser connector is experimental.
Before you start
- inbox permission and a connected account.
Step-by-step instructions
- Open Personal messaging assistant.
- Follow the account/connector setup instructions on the page.
- Select an account and conversation.
- Read the context and check the message before using permitted sending actions.
Requirements and notes
- Experimental and dependent on the connector/browser.
- Separate from the fanpage inbox under Customer service → Messenger.
Reports & account
11 topicsSEO report
Aggregate SEO reports using the available interface filters.
Before you start
- Permission for the relevant report section.
Step-by-step instructions
- Open Reports and choose the relevant report.
- Choose a period and project using the filters.
- Read metrics and data status.
- Verify source data before drawing conclusions.
Requirements and notes
- Missing data is not zero; a form request does not establish a confirmed appointment.
Website interactions
Website interaction reports based on recorded data, with time and scope.
Before you start
- Permission for the relevant report section.
Step-by-step instructions
- Open Reports and choose the relevant report.
- Choose a period and project using the filters.
- Read metrics and data status.
- Verify source data before drawing conclusions.
Requirements and notes
- Missing data is not zero; a form request does not establish a confirmed appointment.
Customer service report
Customer service reports by period and project, based on conversations and requests.
Before you start
- Permission for the relevant report section.
Step-by-step instructions
- Open Reports and choose the relevant report.
- Choose a period and project using the filters.
- Read metrics and data status.
- Verify source data before drawing conclusions.
Requirements and notes
- Missing data is not zero; a form request does not establish a confirmed appointment.
- The old /customer-service/dashboard URL redirects to /reports/customer-service.
Personal notifications
Your personal notification inbox and access to notification settings.
Step-by-step instructions
- Open Notifications.
- Read a notification and open its related item.
- Open Profile → Notifications to change preferences.
Requirements and notes
- Personal notifications are not a log of every user in the organization.
Personal account
Access Profile, Password, Notifications, Invitations and Orders.
Step-by-step instructions
- Open Profile from the account menu.
- Select the relevant tab.
- Edit information or handle invitations/orders through the interface.
- Save and check status.
Requirements and notes
- Personal orders are separate from permission to manage the organization's subscription.
Profile
Manage your profile in your personal account.
Step-by-step instructions
- Open Profile → Profile.
- Check current information.
- Perform the required action in the interface and verify the result.
Requirements and notes
- Applies only to the currently signed-in account.
Password
Manage the password for your personal account.
Step-by-step instructions
- Open Profile → Password.
- Check current information.
- Perform the required action in the interface and verify the result.
Requirements and notes
- Applies only to the currently signed-in account.
Notifications
Manage notifications for your personal account.
Step-by-step instructions
- Open Profile → Notifications.
- Check current information.
- Perform the required action in the interface and verify the result.
Requirements and notes
- Applies only to the currently signed-in account.
Invitations
Manage invitations in your personal account.
Step-by-step instructions
- Open Profile → Invitations.
- Check current information.
- Perform the required action in the interface and verify the result.
Requirements and notes
- Applies only to the currently signed-in account.
Orders
Manage orders in your personal account.
Step-by-step instructions
- Open Profile → Orders.
- Check current information.
- Perform the required action in the interface and verify the result.
Requirements and notes
- Applies only to the currently signed-in account.
Check when a feature does not work
Identify problems using the screen, permissions, inputs, task status and actual errors.
Step-by-step instructions
- Identify the menu, action, project/language and exact error message. Do not ask users to send secret keys.
- If a menu or tab is missing, check roles and capabilities with an owner/admin. The landing_page scope differs from a full website.
- If metrics are empty, check connected providers/GSC/GA4 and synchronization timestamps; do not replace missing data with zero.
- If AI does not run, check quota, budget and model messages and task status. Long jobs run in the background and require waiting for results.
- If the model reports missing tools or writes commands as text, check the chat model/override and use a model supporting tool calling.
- If the cause remains unverified, identify missing information and collect a specific error or screen before drawing conclusions.
Requirements and notes
- Do not claim settings were fixed or a job finished without an actual result.
- Worker infrastructure checks belong to operations administrators. Application users should not be asked to run server commands unless they administer the server.